Development of GNS3
Using the GNS3 API
http://api.gns3.net/en/latest/
Get the Source Code
At first you need to clone both project:
git clone https://github.com/GNS3/gns3-server.git
git clone https://github.com/GNS3/gns3-gui.git
If you want to access to the code of next big release in both project:
git checkout NEXT_RELEASE
For example:
git checkout 2.0
Dependencies
Linux
If you are on Linux the best is to install GNS3 via the ppa. This will setup all the dependencies required for the development.
Go to both folder (gns3-gui & gns3-server)
sudo pip3 install -r dev-requirements.txt
Windows
On Windows you need to install Python 3.5 and PyQT. Go to both folder (gns3-gui & gns3-server)
python.exe -m pip install -r dev-requirements.txt
Mac OS X
With homebrew:
brew install python3
brew install PyQt5
Go to both folder (gns3-gui & gns3-server)
pip3 install -r dev-requirements.txt
Run Tests
For Linux & Mac OS X
After that the tests should work go to both projects. And run:
py.test
For Windows
After that the tests should work go to both projects. And run:
python.exe -m py.test
Start the Server
For Linux & Mac OS X
Go to the gns3-server folder and run:
python3 -m gns3server --debug --local
For Windows
python.exe -m gns3server --debug --local
Start the GUI
For starting the gui go to the gns3-gui folder.
For Linux & Mac OS X
python3 -m gns3
For Windows
python3.exe -m gns3
Modify the GUI
We will start by a simple modification by adding your name to the thanks to in the about dialog.
In the gns3-gui folder open with the Qt Designer the file gns3/ui/about_dialog.ui click on Thanks to and add your name to the list:
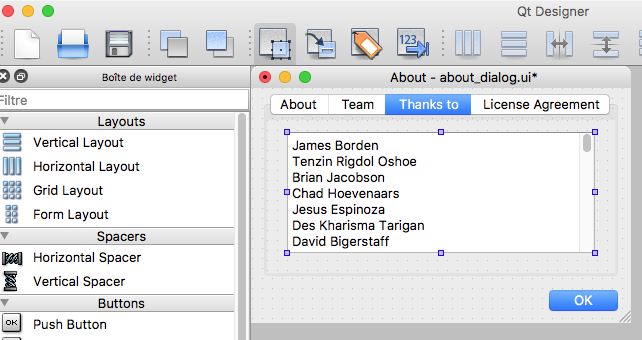
Click on About (otherwise the dialog will open the Thanks to tab) and save. Now you need to export the dialog to python code. Just run:
python scripts/build_pyqt.py
This will regenerate all the changed Qt interface. You can now start the GUI and see your change.
Contribute Code
You can create a pull request on Gui or Server via Github. Even for work in progress code. We will help you.